Showing posts with label summer. Show all posts

Friday, May 16, 2014

styled Book Shelves For Spring And Summer

I made it!  I made it to Friday!  I knew I could crank out this post!

Weeks ago I styled my book shelves for the spring and summer season.  I felt inspired to add color.  In fact I wanted to add “blue”.  I’ve never had the color blue in my house.

Today is the day I’ll share how I added color.

I’ve always tried to keep things neutral in my home.  Mainly because I don’t have the budget to keep changing it as styles and or colors fade. 

But this is easy!  I gathered up things through out my house.  Nothing was off limits.  I rounded up things from the girls’ room, sitting on the chest of drawers in our master bedroom and even wrapped and tucked away in boxes of the basement.  I collected everything that was blue or in the blue family.  Books, boxes, vases and little trinkets were among the gathering.

016

I have to admit the styling part of each shelf and for each shelf to flow with one another was not easy.  It took several tries and several days.  Soon I liked it and it all was cohesive.  My advise to you is hang in there.  Keep moving things around.  Prop items up or lay them flat.  Layer items in front of other items.  And don’t forget to bring back some green!  Eventually it will come together.  If you’re stuck browse the web.  Pinterest is an awesome source of images.  Just type in book shelves and an abundant collection of ideas will pop up.

I’ll do a post sometime soon on the art within the book shelves.  All the art was done by me.  Some I did in my college days and some I did just recently.

024 

I’ll try to do a DIY post on my abstract painting.  I did not take any progress pictures….I will try to recreate it.  It took me probably 20 minutes to complete.  I really feel anyone could do this one!

I added pops of dark pink faux flowers through out.  The dark pink along with white, blends well together with the shades of blue.

027

028

039

Nothing was off limits.  My daughter's peacock she made in 4th grade was a fun unexpected choice.  Since this picture I’ve added my second child’s art pottery project to the shelves.  They were very excited to have their pieces displayed somewhere besides their bedroom!

052

042

On the other side of the room I simplified the entry cabinet with faux flowers, books and a few trinkets and of course accessorizing in the color blue.

046

066

The little blue trinket container was made by my Grandma, who has since passed.  I dug it out of a box of things my parents packed away for me.  It was once displayed on the shelves in my room as a child.

069

I’m thinking I will keep this look until fall.  The color blue reminds me of the sky found in summer.  It’s such a bright blue.  Everyone wants to be outside enjoying what summer has to offer.  The warmth on our skin and under our feet always makes people happy.  Why not bring a little of that outdoorsy feeling inside. 

Thanks for reading!

Bye for now.

Wednesday, May 14, 2014

Has It Really Been That Long

Oh my!  Has it really been 2-1/2 months since I’ve last written?! 

School is nearly over for the summer and soon I will have a 7th, 5th and 1st grader.  That doesn’t seem possible!

Today is the ideal weather for Nebraska.  It’s a comfortable 67 degree with bright blue skies and just a few fluffy white clouds. 

070

Everyone in Nebraska would agree….this weather doesn’t last long.  It soon will be very hot and shortly after that it will be extremely cold.  In fact a lot of our trees, shrubs and flowers have had a delayed budding season due to the late coldness.

I have the windows open and a fresh clean smelling air is blowing in.  And for some reason I felt compelled to blog once again.  With school winding down and our schedules becoming less busy, I want to give this blog thing another go around.

Several weeks ago I took pictures of my restyled book shelves for the spring and summer.  If you believe it or not, I added color!  Here’s a sneak peek of a picture that I’ll blog about this Friday.

059

Have a wonderful Wednesday and hopefully your weather is just as nice.

Thanks for reading!

Bye for now.

Monday, July 18, 2011

summer activites

  Aren't fusion beads the best?  We love them at our house!


They are the prefect summer activity for when it's just too hot to go outside and you don't own a pool.  The beads keep them occupied while they are making their creations for awhile.  I iron them.  Then it keeps them a occupied for a little while longer as they play with their new designs.

Working right besides them....is me.  I am on a twine kick!

I needed a vase for some flowers for my front entry desk.  I just wasn't finding anything in my house that would work. 

I found this painted flower glass vase underneath my sink, but I wasn't diggin' the painted flowers nor did I think I ever would.  The shape and size were perfect though.

So I thought what if I were to cover it with rope?  But I first needed to address the painted flowers and how would I cover the top inside?  I had never painted glass before...is it doable? 

Yes it is!  I sprayed the vase with several coats of spray paint.

Here is a mid-way picture of my process.


I coiled rope around the vase and hot glued it into place.


You could buy rope/twine at any hardware store.

While I had my glue gun out, I've been meaning to make some "summer time" decorative balls.  I've done the moss balls pictured here at Easter time and crepe paper flower balls found here.  Now it was time to make some "summer-time" decorative balls.  There is just something with rope that makes me think of summer.  I really don't know why I feel this way, we don't remotely live close to water.  None-of-the-less it reminds me of summer and water.

So while I had my glue gun out, I grabbed some of my dollar store plastic balls and started wrapping twine around and around. 


They took very little time to make and they add such texture to any display area.


Here they are grouped with other items above our TV in our living room.


And finally pictures of my finished vase with my fabric flowers.


I hope everyone is keeping cool...it's hot in almost of every area of the country.  Enjoy your indoor activities!

Thanks for stopping.

Bye for now!

Tuesday, July 5, 2011

summer birthday wreath

  I hope everyone had a blast this 4th of July.  I know my family did shooting off fireworks!


I love this picture of all of them huddled around Dad lighting a snake, even the dog wanted to be a part of it all.

This weekend was filled with everything that has to do with birthdays.  Buying presents, wrapping presents, making decorations, hanging decorations and planning my grocery list.

I finally finished several projects that I will share in the next couple of days.  Today I will show you my front door wreath.  If you have read my blog before, you might have noticed that I love making wreaths!  It's a quick project that I usually I can get done in a day.  And if not I can usually work on it during nap time.

This wreath is by far my favorite!  I will probably do this again, just using different fabrics.
Watch out there are a lot of pictures!


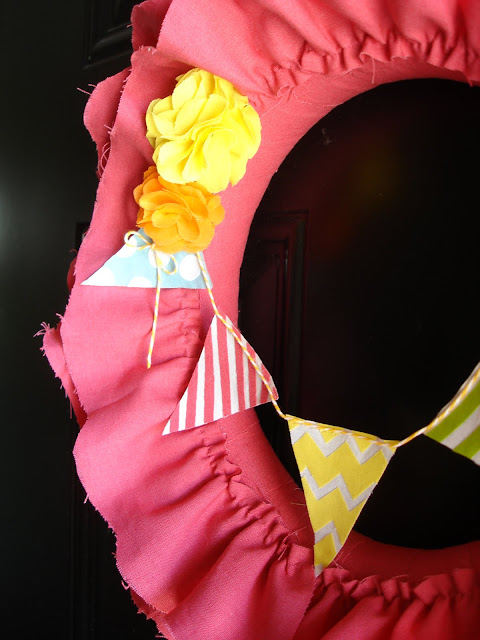
Instead of wrapping the ruffle around the wreath like I did in the previous one, I ran the ruffle in circles.

I started with just one long 3" wide strip of fabric.  I ruffled it and pinned it to the wreath.  It so was missing something!  Then I cut another 3" strip and pinned it to the back of the wreath.  It still looked like I needed to add another strip.  I cut another one and pinned it in the middle.


I didn't like how you could see the pins in the ruffle so I hot glued only the inner ruffle.  No need to do the other 2 - you don't see them.

I didn't like how the edge of the ruffled fabric was straight.  So I free-hand scalloped the edge and then frayed it.  I love the tatted undone look!


I added some flowers and made a banner that coordinated with my invitations.  I hung the banner with some orange baker's twine.  I had originally thought I would also include a "Happy Birthday" stamped on a piece of paper and hung with the flowers but I now think it might be too much. 


The yellow zig zap banner is my favorite!


I thought I would show you one last picture of our 4th of July.  In this part of the country these fire-proof fabric lanterns that you set on fire, somewhat like a miniature hot air balloon are all the rage.  So of course we needed to get one.  You might think it's illegal - I sure did when I first saw it.  But they're not and according to the fire marshall he says they are safer than fireworks.  Our night sky was filled with them.  It was quite a sight!  Our girls were so hoping to follow one and catch it as it drifted down to the ground but not such luck.  But when we woke this morning one had come down in our back yard.  Our Hannah said because of it it was going to be her lucky day!  How cute!


Thanks for stopping.

Bye for now!

Linking to these parties:


Wednesday, June 15, 2011

my summer wreath

 I needed to change out my wreath for my front door.  I loved the look of all the fabric flowers but I wanted something more summer-like.


So I headed to the goodwill.  To my surprise it was $1.00 shirt day!  Yeah!  I stocked up on vibrate summer colors that I could cut and sew together.  I could just feel the curiosity the lady who helped check me out on what I was planning on doing with these shirts.  I definitely was not going to be wearing these!


I also wanted to do something different than a yarn wreath.  I followed the tutorial from Jones Design Company found here.  I am so not a sewer!!!!  And with this tutorial you have to sew. 

I had bought a sewing machine shortly after I graduated from college.  My dreams of becoming a designer who could offer made-to-order sewn pillows and curtains for customers was short lived, or should I say never lived!  OH-well....I now have a machine that has come in handy. 

My machine did not come with a ruffling foot....(I don't even know if that's the correct name) nor did I know how to adjust the stitches to make it ruffle.  I did know how to pull the thread and gather the fabric.  And I did start to do that, but that was pain-staking to say the least.  Plus my thread kept breaking and all that I gathered before came undone. 

I had come across this awesome sewing blog that she had made a summer scarf found here.  She used elastic thread in the bobbin.  She also said that in some machines it doesn't work.  OH-gosh.....I had my fingers double crossed that it would work in my mine. 

I had some elastic thread left over from my little-girl-hair-making-days (another dream that really never took off and I have incredible amount of bows left over to show for it).  I wound it up on the bobbin, it was tricky, and put it down in the machine.  And it worked! 

I didn't have linen on hand to use as in the tutorial.  I used that Osnaburg fabric (don't know if that's the correct name or not) found cheaply at Walmart.  It ruffled great!  It was light weight and was perfect for my summer wreath.


I liked the ruffles going down the wreath versus the one coming up.  So I wanted to hide them and decided to put my flowers on that side.


I made a ton of flowers and I dont' know if it seems to much.  I really like the different colors it adds to my front door. 

I have flowers in planters on my front porch and this wreath mimics those colors.


Thanks for stopping by.

Bye for now!

Linking to these parties:


UndertheTableandDreaming