Showing posts with label fall. Show all posts

Thursday, October 17, 2013

Styled book shelves reveal

Our book shelves are finished and completed styled! 

You can read about my first craigslist purchase and the installation of these book shelves.

Book-shelves

I love how they look in our entry area and I am totally satisfied!  It definitely adds warmth and completes this small and awkward entry area.

I am finally at a point where I can say I am done!  I like each and ever shelf and the story it tells. 

First off…..I have to admit I was scared!  Scared of buying a ton of new items to fill each shelf.  Really scared that because the shelves were so deep it was going to take A LOT OF STUFF!  Buying new things WAS NOT an option.  I had to make due with what I had and to “shop my house”.

075

To contradict on what I just said, I did buy 3 new picture frames with birthday money and a gift card to Hobby Lobby.  So I guess it’s not really money out of my pocket.  My favorite item on both of the shelves has to be my newly purchased gold and silver mirrored picture frame.  It sparkles every time I walk by and reflects light from almost every angle.  That one piece started my so called “theme” of using gold and silver through out the book shelves.  I’ve done a mix of both and I really like how it’s looking.  I bought it at Hobby Lobby in their Christmas display area, but I think I will end of using it all year round.

087

I have used treasured family heirlooms that are special to me in some areas….

085

and special items that are mine in other areas. 

094

It might be weird but I think I have a candle stick obsession!  I have several:  wood, brass, silver, glass and even rattan.  If I’m out shopping it’s one of the things I look at the most and I think that I need.  When in actuality have I several of the same kind at home.  I want to see how it would look if I burn down some candles to put in the candle sticks.

091

Favorite photos of my kiddos and marble-looking paper in all the right colors fill picture frames.  Right now the family photos are of fall scenes and I’m thinking I will switch them out as the seasons go.  Trinket boxes and flowers fill other spaces and color coordinating books laying flat or standing up fill other areas.

The item I’m most surprised at myself for including has to be my Dad’s deer antlers.  I never thought I would EVER EVER have antlers displayed in my house.  About a year ago I started noticing antlers hung in interiors of homes that were not log cabins or homes that had hunting memorabilia.  They were just hung for their beauty and for their sculptural nature. 

My book shelves may be deep but the height of the shelves itself was not big enough for me to prop the antlers up.  I had to lay them flat.  I’m actually preferring it anyways.  Yes, they are backwards as my husband pointed out but they just didn’t work with them turned around.

095

Finished!

I’ll tweak things from time to time and as the seasons go.  I can’t wait for Christmas time and infuse seasonal and wintery items.

097

Of course I still have my kiddos silhouettes.  They had to be moved a bit from the increase of the book shelves' depth.  If you are interested in making your own you can find my tutorial here.

102

Onto the other side of the room, the black cabinet is finished with my mirror hung above.  BUT….I’m not totaled satisfied with it.  I mean everything is all nice and fine and I don’t want to change anything but it just seems sort of wimpy sitting up against the wall.  I’ve thought about adding some pictures on both sides of the mirror to add more presence on the wall.  Possibly adding a stool to one side and maybe an umbrella canister or a coat rack for the other.  I don’t know…have to see what I come across and what I can find.

114

109

Until then please take away one lesson from this post.  Use what you have!  I pulled things left and right from different rooms of the house switching things around seeing if it would work.  I pulled things from our bedroom, my daughters’ bedroom, boxes in the basement and even grandma’s house.  See what will work.  Change an item by painting it or using it in a different way.  If you tackle a project like this and before you buy a ton of new things, “shop your house”!   

Thanks for stopping!

Bye for now.

Linking to these parties:  Romantic Home, The Charm of Home, Jennifer Rizzo, Chic on a Shoestring Decorating, The Shabby Nest, French Country Cottage, Tatertots and Jello, Under the Table and Dreaming, Lamberts Lately, Living Well Spending Less, Finding Fabulous

Monday, October 8, 2012

fall entry way

  I thought I would start today by showing my fall entry. 
 
Right when you walk in is my famous Pottery Barn chair.  As I have blogged about it before, my husband and I were not in totally agreement about.  Or it's been so long since I've purchased the chair I might have the story wrong.  I think I told him I was buying a chair and he said fine.  OK.  Once it is in our home he couldn't believe I spent money on it as it is not even an ounce bit comfortable.
Yes I have to admit that, but I sure looks great!
 
Next to it is our computer desk that we refinished red a couple of years ago.  Today, I am rethinking the red or should a dare say I've been thinking about it for awhile now.  Don't tell my husband!  He did all the work, he sanded, stained and lacquered.  All I did was distress it with a little black paint and ordered the knobs.  I didn't even put those on. 
 
 
I love the look of curly branches!  I have kept them all spring and summer season basically naked with nothing at the base.  For fall I decided to add some fall orange flowers with beads and brown feathers.  It creates more interest at the base.


I see metallic pumpkins everywhere this year and I bought a small one from Hobby Lobby.  The pumpkin picks up the orangey color of the flowers in the branches.

 
I have had my book page wreath displayed here for the longest time, you can see it here.  As I was browsing Pinterst one day looking for a new wreath, either to make or buy, I came across this one at save-on-crafts.com.  It had all the colors I wanted to incorporate and it was just the right size.  Plus the colors I thought could carry into the winter season after the holidays.  I contemplated on buying feathers and making it myself.  But once I looked at prices for feathers it would have been too costly.


On the other side of the entry is my gallery wall.  I do change out photos according to the seasons. 
 
One might think it's a bit nutty but I usually coordinate the photos to the season. 
 
The ones I have up now are from my kiddos at the pumpkin patch last year.  We are going to go in October and I'll take a gazillion pictures of them doing all sorts of pumpkin patch activities.  Whether or not I put those up I don't know, but at least I have fall photos up now. 

 
I always try to include some art work, and it's usually simple stuff that I do.  Like this one of the leaves.  I just double-sided taped these leaves onto white paper and stuck it under a mat.  I also did it here on my fall mantel.
 
 
I also included pictures of pumpkins that are ironed onto fabric and then stapled onto a canvas.  These are the first I did a couple of years ago.  Now, instead of stapling them onto canvas, I use a piece of wood.  The wood is free.  We have wood lying around in our garage and my husband has a fancy table saw that he can use to cut me whatever size I want.  If I want to hang it I simply hammer on a wall hanger. 
 
I just did a search on Etsy to see if these images are still available and I did find the smaller pumpkin here. 


We hope to go to the pumpkin patch this Saturday.  We are all looking forward to it. 

I just saw the weather forecast and it's suppose to rain.  Boo! 

Thanks for stopping.

Bye for now!

Monday, September 24, 2012

welcome back fall and me

  Yes, it's been awhile! 
 
I don't have any reasons why I haven't written.  No major life changes or illness which is always good news.  I guess I've been busy, lazy and I honestly haven't had much to write about. 
 
Until now!
 
I've been really motivated with the upcoming holidays.  My house is decked out in fall.  I've even looked through my Christmas ornaments packed downstairs to see what I can do differently for this year. 
 
So again I welcome fall with my corn husk wreath for the front door.
 
 
Instead of tying the orange ribbon into a bow like last year, I wrapped it and tacked it to the top of the door.  This gives the wreath a cleaner and more polished look.  You can read how I made this wreath by clicking here.

 
Then off into our living room...
 
 
I don't believe I've ever showed a complete picture of the room.  We do not have a fireplace with a mantel, but I have a little niche above our TV that I change out as the seasons come. 
 
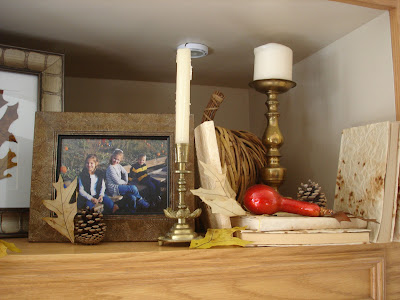
Right now I have wicker pumpkins, leaves, gold candlesticks, a collection of books and 2 pictures: one of my 3 favorite people and one that I put together a grouping of leaves.
 
In somethings I like order and symmetry and somethings I like random placement.  In this situation, I like how there are varying heights in all areas of the niche.  It's not predictable!
 
 
I did notice that it is some what hard to see the larger pumpkin in these photos.  So I did raise it up a bit but did not retake the pictures.

 
Also I'm not totally sure on my leaf art picture.  I don't know if I like the white mat on the white piece of paper the leaves are placed on.  The mat blends in and it's hard to tell that it's even there from a distance.
 
My Dad has given me a cutting mat contraption along with several different colored mats that I know one would look good in this grouping, but the thing looks COMPLICATED and haven't asked for a tutorial on how to use it. 


So there is my fall mantal and hopefully my first of many blog posts yet to come and finish out the year.
 
Welcome back me!
 
I look forward to sharing with all of you as the seasons go.
 
Thanks for stopping,
 
Bye for now.


Tuesday, November 22, 2011

freezer paper book covers

I wanted to share with you how I made my book covers for my display niche above our TV.


I wanted an uniform book look and didn't have a collection of all the same books with same covers. 

I remembered reading about this tutorial found here, where she coffee stained shipping tags as a seating placement card.  I used the same technique on freezer paper and cut it to fit as a book cover.

I started by cutting sheets of freezer paper large enough to cover my books.  Make sure you cut it large enough, you will see why at the end once it drys.


Then I crumbled some up and others I folded.  I found that the manner in which you do this will leave a different pattern once it gets wet.


I prepared my instant coffee according to the directions and then dunked the paper into the coffee.

Watch out it will be hot!


Then I laid it out.....it's OK if some coffee remains on the sheet.


I then dibbled some of the granules onto the sheet into the excess and watched as it slowly dissolved.


I dabbed some of the excess liquid off.


It happened to be a nice day and I laid them outside to completely dry.


I didn't take a picture of the next steps but I cut the sheets to fit the books as a cover and hot glued them on. 

If you notice in the picture that the ends curled a little and that's why I suggested cutting the freezer paper a little larger than the book.  I cut around the curls for a straight edge.


I think I will always have these books as props in my display space.  They are a good neutral color with some interest and an unique texture.

I MIGHT try diluting red or green craft paint and doing the same technique for my Christmas display.  I am working on several things...ornaments, tree topper, wreath along with Christmas shopping and OH-My a little guy's 4th birthday party! 

I feeling a little stressed and the season hasn't even begun!

So the neutral book covers might need to work though this holiday season.

Thanks for stopping.

Bye for now!

Friday, November 11, 2011

fall gallery wall

I might be a little late on finalizing my fall gallery wall knowing that Christmas is just around the corner, but my summer pictures had to come down.  I wanted to replace them with ones from our pumpkin patch visit.  It was such a fun time!


I love the mix of colors the fall season brings and I wanted to incorporate them into my gallery wall.


Again I brought in some of our front porch pumpkins and leaves, like I did here, and used them as accessories to the wall.  Instead of doing all pictures I like to frame different seasonal elements like I did with this pumpkin.  I printed it off onto colored card stock and framed it.  It was an image, along with the others, bought on Etsy last year.  Unfortunately, this seller is not selling these images anymore.  But I'm sure you could do a search and find something similar.


I just love these little pumpkins...they bring in an interesting pumpkin color variation.


I will do a post on the making of the letter "G".  It's really quite simply.  I drew the letter on a scrap piece of wood we had in the garage and my handy husband cut it out.  Then I cut stripes of linen fabric and wrapped it around. 


This was another image from the same seller.  I printed it off onto transfer paper and ironed it onto the fabric.  Then I stapled the fabric onto another piece of scrap wood and had cut into a square.  I've also framed several of similar pictures, but I like how this one looks more like a piece of canvas art.


I kind-of don't know why I did all this work when I'm going to be changing it soon for the winter season. 
I just can't get enough of looking through Christmas catalog after Christmas catalog.  I've checked out multiple issues of past years of several major magazines at the library.  I am so excited for the Christmas season!


I am in the process of taking these ornaments apart.  I made them 10-15 years ago and they need a face lift.  Plus I'm tried of the green and blue!
  Also I inherited a large tree that I might put up in our front foyer room along with our normal tree in our family room.  2 big Christmas trees in a small house with 3 children and a husband not liking the sound of that...hmmm will this work?  Stay tuned....

Thanks for stopping.

Bye for now!

Linking to these parties: