Showing posts with label wreath. Show all posts

Monday, September 24, 2012

welcome back fall and me

  Yes, it's been awhile! 
 
I don't have any reasons why I haven't written.  No major life changes or illness which is always good news.  I guess I've been busy, lazy and I honestly haven't had much to write about. 
 
Until now!
 
I've been really motivated with the upcoming holidays.  My house is decked out in fall.  I've even looked through my Christmas ornaments packed downstairs to see what I can do differently for this year. 
 
So again I welcome fall with my corn husk wreath for the front door.
 
 
Instead of tying the orange ribbon into a bow like last year, I wrapped it and tacked it to the top of the door.  This gives the wreath a cleaner and more polished look.  You can read how I made this wreath by clicking here.

 
Then off into our living room...
 
 
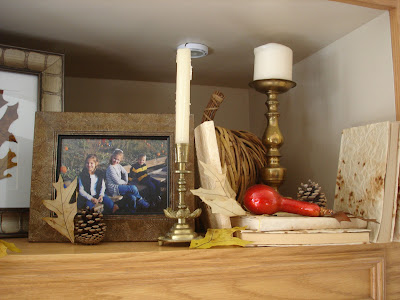
I don't believe I've ever showed a complete picture of the room.  We do not have a fireplace with a mantel, but I have a little niche above our TV that I change out as the seasons come. 
 
Right now I have wicker pumpkins, leaves, gold candlesticks, a collection of books and 2 pictures: one of my 3 favorite people and one that I put together a grouping of leaves.
 
In somethings I like order and symmetry and somethings I like random placement.  In this situation, I like how there are varying heights in all areas of the niche.  It's not predictable!
 
 
I did notice that it is some what hard to see the larger pumpkin in these photos.  So I did raise it up a bit but did not retake the pictures.

 
Also I'm not totally sure on my leaf art picture.  I don't know if I like the white mat on the white piece of paper the leaves are placed on.  The mat blends in and it's hard to tell that it's even there from a distance.
 
My Dad has given me a cutting mat contraption along with several different colored mats that I know one would look good in this grouping, but the thing looks COMPLICATED and haven't asked for a tutorial on how to use it. 


So there is my fall mantal and hopefully my first of many blog posts yet to come and finish out the year.
 
Welcome back me!
 
I look forward to sharing with all of you as the seasons go.
 
Thanks for stopping,
 
Bye for now.


Tuesday, March 6, 2012

my winter wreath

Seeing that it will be nearly 70 degrees today, I figured I better post about my winter wreath.  Spring is right around the corner and I am already thinking of what to do for spring.

This was my Christmas wreath that never was written about.


I got the idea from Martha Stewart found here.  It took me a looooooong while!  I started with an 18" straw wreath.  I have never used this size: I wanted something bigger for the holidays.

Well, I started with one bolt of yarn and did make it all the way around once.  But there were gaps and you could see through it.  So back to the fabric store I went.  I grabbed 2 more bolts, thinking I only needed one more but just in case I bought another one.  I probably didn't need the third but I wrapped it around as well.  The outcome is a nice fluffy non-see through yarn wreath. 

Now that the core wreath was done, it was time to embellish.

Making the flowers also took some more time!

Martha Stewart's wreath consisted of using different color ribbons with different textures.  I did price it if I were to do it exactly like she did using her source....mega expensive! 

I had bought a some velvet and satin fabric to re-do some Christmas ornaments.  I decided to give the fabric a try.  I made myself a template in 4 different sizes and traced away. 

I followed the directions online and put the flowers together. 

Instead of covering the entire wreath I decided to pin the flowers only on one side.

After this was all said and done it was only a few days before Christmas.  It was such a shame to take it down so hence the idea for my "winter wreath".

Here in Nebraska the ground is shades of brown and gold and often times covered with snow.  I wanted to incorporate those colors into my wreath.

At the fabric store I bought 1/2 yards of different colors and textures that I thought might work.


Some fabrics were easier to work with than others.  So beware.

Also I hung the wreath from a ribbon that I thumb tacked to the top of the door.  I didn't want to use my standard black hook.  I think I like it!


I used several different flowers stamens or "pips" in various coordinating colors and sizes.  I found most of what I used on Etsy.

I also ran the edges of the fabric petals through a candle to seal them.  I did this afterwards once I noticed the edges fraying after being on the wet-icy door.  If I were to make flowers again, I would do this before constructing the flowers.  It just gives it a more polished look.


Stay tuned for a spring wreath.  Hopefully it wouldn't be almost summer before I write about it.

Thanks for stopping!

Bye for now. 

Wednesday, September 28, 2011

welcome fall {and a harvest wreath}

  I've been away half the summer and now it's fall.  Where has the time gone?!  Welcome Fall!  I love this time of the year...crisp cool air, leaves changing, but most of all being snug warmly inside our home.  And for some reason I enjoy our clocks being set back an hour.  I'm not to keen on it getting dark at 5:00 and I'm sure my children would rather be riding a bike or throwing a ball outside.  But I like our nights of doing homework and sharing a good children's book all snuggled up on the couch.  We have a little while until that happens.  I guess the weather changing always reminds me of that time of year.


Welcome Fall!

I have been in changing mood around our house; putting away summer clothing, getting out jeans and long sleeved shirts and displaying all my fall decor.  To start off the fall season, I will show you my front door wreath. 

If you have read about me in the past you know that I love making front door wreaths!  You can find some here, here, and here.  But for some strange reason I contemplated on buying an-already-made-fall-wreath.  Until I came across this picture on Martha Stewart.


I fell in love! 

Even the mirror that it's displayed on!  For my birthday, my handy husband is in the works of making one like it.  I kept bothering him and bothering him one weekend about making it for me.  By the chance it was around my birthday and he has agreed to make it for me.  Yippee!  I love the edge detail on top to display items over and in front of the mirror. 

If he were to read that last sentence he would probably say, "What's the point of having the mirror if you can't see yourself in it."  Well yes that's true but it sure looks nice and he can go ask Martha about that one.

Whenever it gets finished and it will, handy husband is good like that, I'll be sure to post pictures.

On to the wreath....

Here's the link from Martha Stewart for the detailed instructions.  I pretty much followed it... but here's my take on it.


I started with a straw 14" wreath, purchased dried corn stalks and U-pins.  I followed the instructions and soaked the corn stalks and folded and pinned.  After I had several rows like in the photo, I noticed the rows going crooked.  So I took them off and started with a single row in the inside of the wreath all the way around (so sorry I didn't take a picture).  That gave me a guideline in which to follow with the other outer rows. 

Here's the finished product and surprisingly it didn't take all that long.  But OMG my fingers hurt!  After soaking the corn stalks and then pushing the pins in with wet fingers, it hurt after the 100th time!


I added an orange 3" satin ribbon which adds a shot of color.


After the wreath was dried I hot glued some of the stalks down that were sticking up a little too much.


I love the texture it gives!  With this wreath against my black door, it really pops!


I was a little worried that the wreath would be squished between my front door and storm door and it would become brittle and crack.  But it hasn't not even a little.  These stalks are tough! 

I bought all my stalks at once at Amazon.  I really didn't know where to begin to look for them in town, plus nor did I have the time to explore.  I bought enough stalks with a little extra.   Acording to the directions it took 4-5 8oz bags.  Yes, the Martha Stewart wreath was bigger, but I didn't even finish one bag.  So needless-to-say I have quite a bit of stalks left over.  So I need to find another project out there using corn stalks.  I might go in a fill some of the empty spots...we'll see.

I already saw a different wreath that I possible might make for the month of October...a little more Halloween spooky.  Then I'll hang this back up in November. 

I have some many projects to write about or finish writing about (several in draft mode) and share.  I love this time of the year so plan on hearing from me a lot!

Thanks for stopping.

Bye for now!

Linking up to these parties:


Tuesday, July 5, 2011

summer birthday wreath

  I hope everyone had a blast this 4th of July.  I know my family did shooting off fireworks!


I love this picture of all of them huddled around Dad lighting a snake, even the dog wanted to be a part of it all.

This weekend was filled with everything that has to do with birthdays.  Buying presents, wrapping presents, making decorations, hanging decorations and planning my grocery list.

I finally finished several projects that I will share in the next couple of days.  Today I will show you my front door wreath.  If you have read my blog before, you might have noticed that I love making wreaths!  It's a quick project that I usually I can get done in a day.  And if not I can usually work on it during nap time.

This wreath is by far my favorite!  I will probably do this again, just using different fabrics.
Watch out there are a lot of pictures!


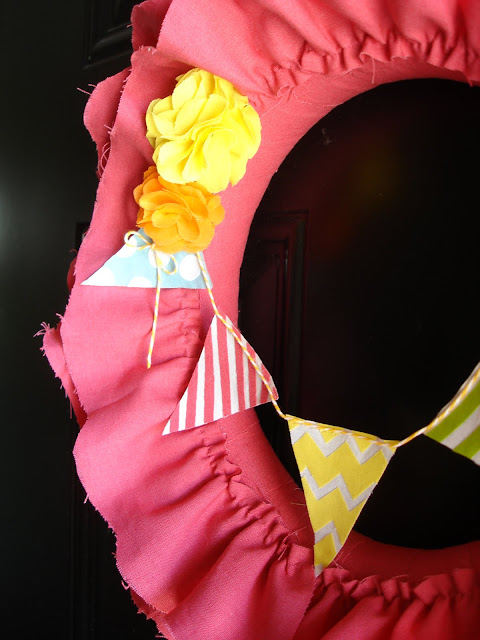
Instead of wrapping the ruffle around the wreath like I did in the previous one, I ran the ruffle in circles.

I started with just one long 3" wide strip of fabric.  I ruffled it and pinned it to the wreath.  It so was missing something!  Then I cut another 3" strip and pinned it to the back of the wreath.  It still looked like I needed to add another strip.  I cut another one and pinned it in the middle.


I didn't like how you could see the pins in the ruffle so I hot glued only the inner ruffle.  No need to do the other 2 - you don't see them.

I didn't like how the edge of the ruffled fabric was straight.  So I free-hand scalloped the edge and then frayed it.  I love the tatted undone look!


I added some flowers and made a banner that coordinated with my invitations.  I hung the banner with some orange baker's twine.  I had originally thought I would also include a "Happy Birthday" stamped on a piece of paper and hung with the flowers but I now think it might be too much. 


The yellow zig zap banner is my favorite!


I thought I would show you one last picture of our 4th of July.  In this part of the country these fire-proof fabric lanterns that you set on fire, somewhat like a miniature hot air balloon are all the rage.  So of course we needed to get one.  You might think it's illegal - I sure did when I first saw it.  But they're not and according to the fire marshall he says they are safer than fireworks.  Our night sky was filled with them.  It was quite a sight!  Our girls were so hoping to follow one and catch it as it drifted down to the ground but not such luck.  But when we woke this morning one had come down in our back yard.  Our Hannah said because of it it was going to be her lucky day!  How cute!


Thanks for stopping.

Bye for now!

Linking to these parties:


Wednesday, June 15, 2011

my summer wreath

 I needed to change out my wreath for my front door.  I loved the look of all the fabric flowers but I wanted something more summer-like.


So I headed to the goodwill.  To my surprise it was $1.00 shirt day!  Yeah!  I stocked up on vibrate summer colors that I could cut and sew together.  I could just feel the curiosity the lady who helped check me out on what I was planning on doing with these shirts.  I definitely was not going to be wearing these!


I also wanted to do something different than a yarn wreath.  I followed the tutorial from Jones Design Company found here.  I am so not a sewer!!!!  And with this tutorial you have to sew. 

I had bought a sewing machine shortly after I graduated from college.  My dreams of becoming a designer who could offer made-to-order sewn pillows and curtains for customers was short lived, or should I say never lived!  OH-well....I now have a machine that has come in handy. 

My machine did not come with a ruffling foot....(I don't even know if that's the correct name) nor did I know how to adjust the stitches to make it ruffle.  I did know how to pull the thread and gather the fabric.  And I did start to do that, but that was pain-staking to say the least.  Plus my thread kept breaking and all that I gathered before came undone. 

I had come across this awesome sewing blog that she had made a summer scarf found here.  She used elastic thread in the bobbin.  She also said that in some machines it doesn't work.  OH-gosh.....I had my fingers double crossed that it would work in my mine. 

I had some elastic thread left over from my little-girl-hair-making-days (another dream that really never took off and I have incredible amount of bows left over to show for it).  I wound it up on the bobbin, it was tricky, and put it down in the machine.  And it worked! 

I didn't have linen on hand to use as in the tutorial.  I used that Osnaburg fabric (don't know if that's the correct name or not) found cheaply at Walmart.  It ruffled great!  It was light weight and was perfect for my summer wreath.


I liked the ruffles going down the wreath versus the one coming up.  So I wanted to hide them and decided to put my flowers on that side.


I made a ton of flowers and I dont' know if it seems to much.  I really like the different colors it adds to my front door. 

I have flowers in planters on my front porch and this wreath mimics those colors.


Thanks for stopping by.

Bye for now!

Linking to these parties:


UndertheTableandDreaming