Wednesday, June 22, 2011

fancy fabirc envelope

OK.  I'm going to sew again. 

I wanted to try to make a fabric envelope as seen on my favorite blog, Jones Design Co, found here

To my surprise it was super easy and the end result looks super cute.

I have several family birthdays in August and I plan to use these to hold gift certificates.


I changed the size of the envelope that Jones Design Co used a little bit.  I made my a bit bigger and I knew I wouldn't feel comfortable sewing the flap detail that she did.  So I made it a half circle flap instead.

You will notice in these pictures that sew lines are NOT straight what-so-ever!  At first I minded but once it's all put together and the rawness of the flower it doesn't bother me.


I played around with using different flowers for each one.  I'm not real sure which one is my favorite.  I like the peach colored one, but the fabric I used sheds instantly the minute you touch it.  You can see it in the picture the amount of strands each piece of fabric has.


Probably my absolute favorite is the one with 3 flowers.  If a person were to ever use this, those flowers seem to be the most durable. 


Also I changed how it closes....I used a snap instead of an elastic band and button.  If I were to do this again I might consider sewing on the snap first before sewing it all together.  It was difficult to sew the bottom snap on to say the least!

It's funny because while I was photographing these envelopes, my girls decided who should get which one.  Apparently the recipients have distinct styles that made it unanimous and easy to decide.

Thanks for stopping.

Bye for now!

Linking to these parties:


UndertheTableandDreaming


Monday, June 20, 2011

etsy shop

  Wow! 


I just listed a few items in my Etsy shop! 

It took some researching and preparing, but I now have several items listed.

I am currently selling printable PDF files of cards and note cards that can be printed off at home or at a local print shop.  Print as many as you like!

I see myself as a crafty person but I have taken my crafty-self into a new direction.  Instead of painting wall letters for a child's room or making little girl hair bows I have turned to my computer.  This new outlet has no physical inventory as in the past, plus I am able to work on it at various parts of the day which I love! 

Here are just a few items that I am currently selling....


Below is what the printable file would look like when sent to you.


 I am also currently selling a template to make the envelopes shown below.  You can print them out or trace them onto decorative/patterned paper.  The template makes an A2 sized envelope.


Click on the Etsy button on the left side bar and that will take you to my Etsy shop.

Thanks for stopping.

Bye for now!

Thursday, June 16, 2011

father's day

 Father's day is coming this Sunday.


Here's a nice picture of him looking all spiffy opposed to him covered in drywall or saw dust.

Happy Father's day to you, Eric!  You are a kind, caring and loving Dad who enjoys ruffhousing with the kiddos.  We love you!

I wanted to create a card from all of us that each one could add their special note in their own handwriting.

I started with these things....


I made a card saying, "We love you, Daddy".

I wanted to add a fabric heart to the center.  So I free-hand cut one from one of my goodwill shirts.  Next, I stitched an outline with my sewing machine to add some extra detail. 

I'm feeling all confident on my sewing techniques now that I can ruffle!


My stitching is a little wonky on one side, but I don't think he will mind.  


I also made an envelope to coordinate and a sticker tittled "Made with love".


Thank you, Eric, for everything you do for us!

Also thank you Dad for being a wonderful father and an awesome grandpa, who loves to play hide-n-seek!

Thanks for stopping.

Bye for now!

P.S.  I am in the process of starting to list printable note cards and single page cards in my Etsy store.  Plus I have also created a template to make your own envelope as shown above.  Stay tuned!


Wednesday, June 15, 2011

my summer wreath

 I needed to change out my wreath for my front door.  I loved the look of all the fabric flowers but I wanted something more summer-like.


So I headed to the goodwill.  To my surprise it was $1.00 shirt day!  Yeah!  I stocked up on vibrate summer colors that I could cut and sew together.  I could just feel the curiosity the lady who helped check me out on what I was planning on doing with these shirts.  I definitely was not going to be wearing these!


I also wanted to do something different than a yarn wreath.  I followed the tutorial from Jones Design Company found here.  I am so not a sewer!!!!  And with this tutorial you have to sew. 

I had bought a sewing machine shortly after I graduated from college.  My dreams of becoming a designer who could offer made-to-order sewn pillows and curtains for customers was short lived, or should I say never lived!  OH-well....I now have a machine that has come in handy. 

My machine did not come with a ruffling foot....(I don't even know if that's the correct name) nor did I know how to adjust the stitches to make it ruffle.  I did know how to pull the thread and gather the fabric.  And I did start to do that, but that was pain-staking to say the least.  Plus my thread kept breaking and all that I gathered before came undone. 

I had come across this awesome sewing blog that she had made a summer scarf found here.  She used elastic thread in the bobbin.  She also said that in some machines it doesn't work.  OH-gosh.....I had my fingers double crossed that it would work in my mine. 

I had some elastic thread left over from my little-girl-hair-making-days (another dream that really never took off and I have incredible amount of bows left over to show for it).  I wound it up on the bobbin, it was tricky, and put it down in the machine.  And it worked! 

I didn't have linen on hand to use as in the tutorial.  I used that Osnaburg fabric (don't know if that's the correct name or not) found cheaply at Walmart.  It ruffled great!  It was light weight and was perfect for my summer wreath.


I liked the ruffles going down the wreath versus the one coming up.  So I wanted to hide them and decided to put my flowers on that side.


I made a ton of flowers and I dont' know if it seems to much.  I really like the different colors it adds to my front door. 

I have flowers in planters on my front porch and this wreath mimics those colors.


Thanks for stopping by.

Bye for now!

Linking to these parties:


UndertheTableandDreaming

Monday, June 13, 2011

fun weekend

We had a garage sale on Saturday that was a huge success!  Along with the sale we had a lemonade stand that was so cute that I just had to share.


I wanted the stand to be more than just a table with a table cloth on it.  I shared my vision with my handy husband and "PLEADED" with him to make it.  He came through!

The base was made from our neighbors palette of their deck expansion.  And he used scrap wood for the posts and sign.  I painted the word "Lemonade" on it and it was done.  I added a red and white checkered banner to it and a gingham table cloth.

We got so many compliments on it.  Someone even suggested to us that we rent it out.  How funny!


Thanks to all of our customers!  Especially to those who said to keep the change!

The same neighbors gave us a pair of roller blades that didn't sell and they were just going to give away.  They were a little small, but they both enjoyed using them.  So with some of our garage sale earnings we bought 2 pairs of roller blades.  I think they expected to roller blade perfectly.  So they were a little discouraged at first.  But now they have mastered the drive way into the street and feel a little more confident.  In the end the girls had a blast!


After little brother was done riding his bicycle, he came out with his new super soaker!  It was quite a sight to see him soak his sisters that can't get away fast while on their roller blades.


We had a fun weekend!  I hope everyone had a nice one as well.

I have a bunch of things that I have been on to show you.  I will share them shortly.

Thanks for stopping!

Bye for now.

Wednesday, May 18, 2011

silhouette giveaway

 
  I just wanted to share that you can have your chance to enter a giveaway for an awesome machine at Tatertots and Jello!


I want this!  I have entered so many of these giveaways.  Gosh, can it please be my turn! 

Click on the button for your chance to win.  Giveaway ends May 23rd.


Thursday, May 5, 2011

Mother's Day

  OH- my goodness!  It's been so long since the last post!  I haven't had anything creative to share...I've been just busy with end-of-the-school-year things.  Gosh I still have up my Easter decorations.  This weekend they're coming down!

I do want to show you what I've made for my Mother and Grandmother for Mother's day.  I somehow seemed to have squeezed enough time to do those this.  This project took a week and several days to complete.  I didn't have everything on hand and going out during the week is nearly impossible.  So my weekends are jammed packed with errand running.

A couple of weeks ago my Grandma had mentioned that she is always misplacing her thank you cards, so I thought I would make her and my Mom some.  I also wanted to keep them in a see-through bag.  I wasn't having much luck in finding a bag, so I made that too.

I started with these things:
Gorgeous printables purchased at Jones Design Company.
Card stock and envelopes
Decorative scrapbook paper
Glue stick, pencil and scissors
(I used my straight edge and Xacto blade because I wanted a clean line - that goes back to my college drafting classes where we were graded on our craftsmanship).

In this photo I wanted to make envelope liners....that's my template at the bottom right.  I traced that onto my scrapbook paper, cut it out and glued the upper portion to the envelope.


Aren't they gorgeous!


Now for my bag...I wanted to use vellum but I didn't have big enough sheets handy.  And going out for these things is quite a driving distance and takes time during the week that I just don't have.  I did not want to leave it for this weekend.  I had to resort to tracing paper - this roll is also back from my college drafting days.  It's a couple of thickness steps up from tissue paper.  It's flimsy....vellum would have worked a ton better but OH-well. 

I thought I would show how to make it when I get scrapbook sized vellum next week.  I was so pleased at how this turned out I thought I would do the same for teacher thank you gifts.


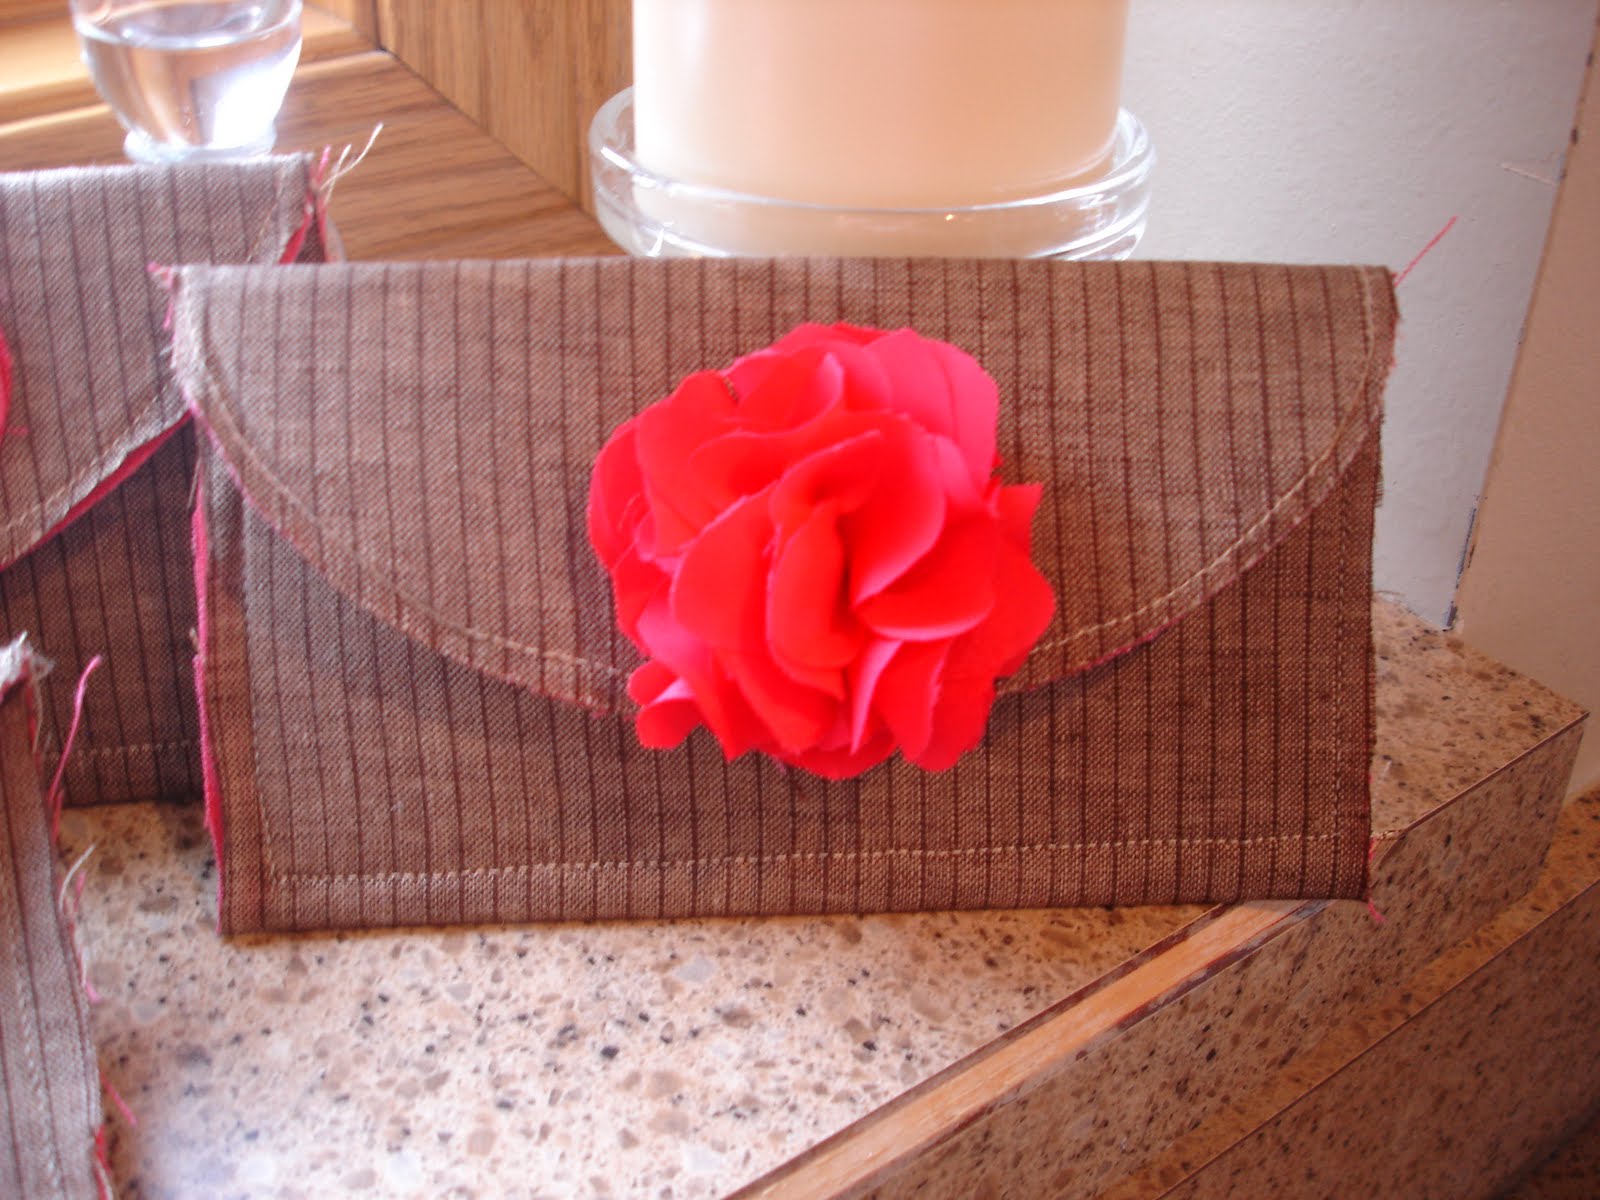
 Finally, and this is a huge last step with many little steps, I made folded flower pins.  Again you can find the tutorial at Jones Design Company.  Can you tell I love her blog!

The flowers took me several days. 

First I needed to find the flower fabric,
then I needed to buy pins,
then fabric for the leaves,
make a template,
traced the template onto the fabric,
cut the fabric shapes out,
sewed the pins on,
hot glued the leaves on,
and finally started hot gluing the "petals" of the flower on.

Are you still with me?

Despite all the gathering and preparing for these gifts, I love them!  I want to keep them for myself!  But I know the recipients will love them just as much as I do - mainly because I made them!  My Grandma will be shocked to learn that I made it. 


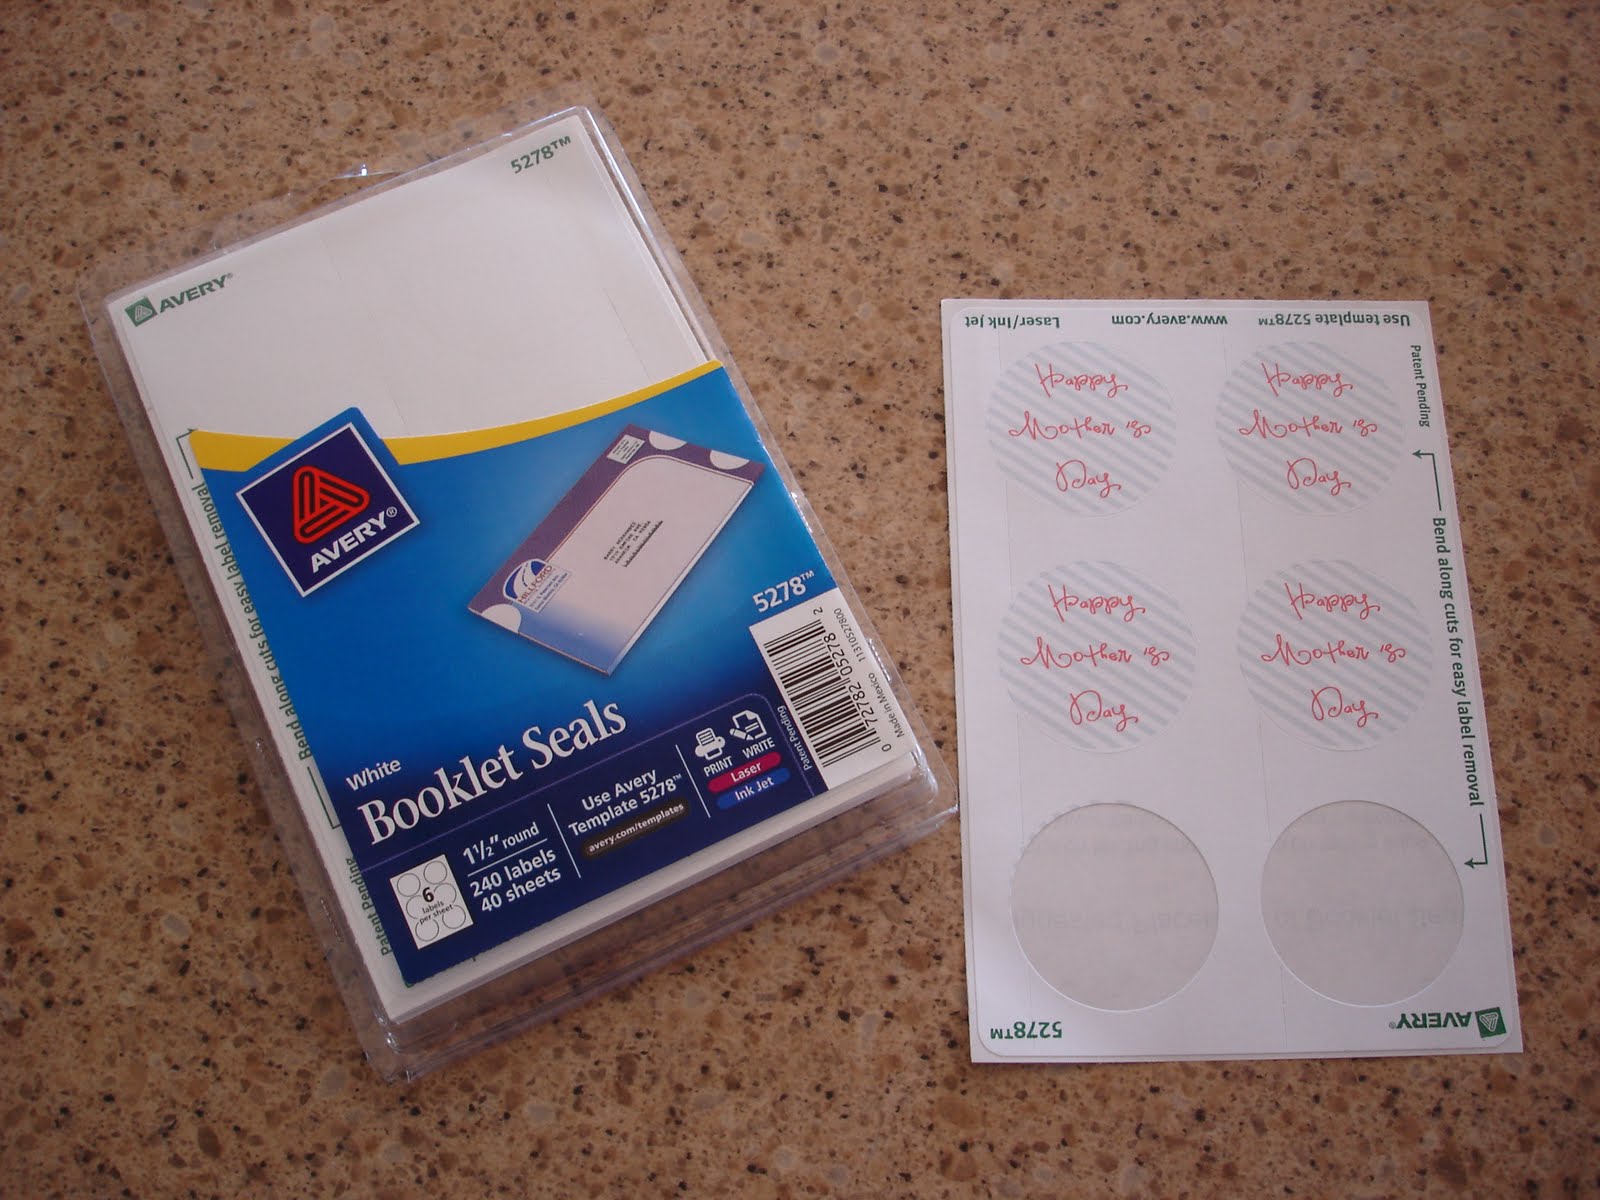
OH and another thing...I made circle stickers that I first was going to use to keep the bags closed.  But once they were applied to the paper, it ripped the paper hence the point of keeping these cards in the bag.  So I stuck the sticker to the front of the bag as a reminder of when they received the cards.

I wanted to attach the design of my sticker as a download, but I didn't know how to do that.  If anyone does, let me know and I'll be happy to. 

The AVERY company has a wonderful free program that can be downloaded from their site.  It has all of their product templates from T-shirt transfers to shipping labels.  It's a neat program!  I inserted the diagonal paper and added text to make my mother's day label.


Have a wonderful Mother's day!

Thanks Mom and Grandma for everything you have done for me!

I truly am blessed!

Thanks for stopping.

Bye for now!

Linking to these parties: