Monday, October 8, 2012

fall entry way

  I thought I would start today by showing my fall entry. 
 
Right when you walk in is my famous Pottery Barn chair.  As I have blogged about it before, my husband and I were not in totally agreement about.  Or it's been so long since I've purchased the chair I might have the story wrong.  I think I told him I was buying a chair and he said fine.  OK.  Once it is in our home he couldn't believe I spent money on it as it is not even an ounce bit comfortable.
Yes I have to admit that, but I sure looks great!
 
Next to it is our computer desk that we refinished red a couple of years ago.  Today, I am rethinking the red or should a dare say I've been thinking about it for awhile now.  Don't tell my husband!  He did all the work, he sanded, stained and lacquered.  All I did was distress it with a little black paint and ordered the knobs.  I didn't even put those on. 
 
 
I love the look of curly branches!  I have kept them all spring and summer season basically naked with nothing at the base.  For fall I decided to add some fall orange flowers with beads and brown feathers.  It creates more interest at the base.


I see metallic pumpkins everywhere this year and I bought a small one from Hobby Lobby.  The pumpkin picks up the orangey color of the flowers in the branches.

 
I have had my book page wreath displayed here for the longest time, you can see it here.  As I was browsing Pinterst one day looking for a new wreath, either to make or buy, I came across this one at save-on-crafts.com.  It had all the colors I wanted to incorporate and it was just the right size.  Plus the colors I thought could carry into the winter season after the holidays.  I contemplated on buying feathers and making it myself.  But once I looked at prices for feathers it would have been too costly.


On the other side of the entry is my gallery wall.  I do change out photos according to the seasons. 
 
One might think it's a bit nutty but I usually coordinate the photos to the season. 
 
The ones I have up now are from my kiddos at the pumpkin patch last year.  We are going to go in October and I'll take a gazillion pictures of them doing all sorts of pumpkin patch activities.  Whether or not I put those up I don't know, but at least I have fall photos up now. 

 
I always try to include some art work, and it's usually simple stuff that I do.  Like this one of the leaves.  I just double-sided taped these leaves onto white paper and stuck it under a mat.  I also did it here on my fall mantel.
 
 
I also included pictures of pumpkins that are ironed onto fabric and then stapled onto a canvas.  These are the first I did a couple of years ago.  Now, instead of stapling them onto canvas, I use a piece of wood.  The wood is free.  We have wood lying around in our garage and my husband has a fancy table saw that he can use to cut me whatever size I want.  If I want to hang it I simply hammer on a wall hanger. 
 
I just did a search on Etsy to see if these images are still available and I did find the smaller pumpkin here. 


We hope to go to the pumpkin patch this Saturday.  We are all looking forward to it. 

I just saw the weather forecast and it's suppose to rain.  Boo! 

Thanks for stopping.

Bye for now!

Wednesday, September 26, 2012

rolled flowers

My favorite thing in the kitchen right now is my vase full of rolled paper flowers. 
 
I'm at my kitchen sink a lot through-out the day and the flowers are so pleasing to look at.
 
I change out the flowers according to the colors of the season. 
 
I collected an array of fall colored papers at the craft store:  yellows, oranges, bronzes and even white with a scrolling gold design.


Rolled paper flowers are nothing new.  One can find tutorials all over the Internet. 
 
Today I'm going to show you how I make mine.  It's easy and the technique can be used as seasons come and go over and over again.
 
I started with all sorts of colored card stock paper - I've used text weight paper and it works fine too
Some sort of stem, I used floral wire
Scissors
Glue gun

 
I start by cutting a square.

 
Then I cut a curvy blob.

 
From there I cut a curvy inward circle, leaving the center uncut.  I've seen tutorials on people drawing this out and cutting along the lines.  I've done this many times I can cut it free-hand, plus I like how it's curvier and more unpredictable.

 
Then I start to roll from the outside.


The center of the uncut circle creates a base to hot glue the flower together.  From this point I might unravel the flower a bit to open it up and then I hot glue it together.


Next, I take floral wire bend the tip and create a hook that is perpendicular to the stem.  This will create a base for you to hot glue to the back of the flower.

 
I cut a leaf shape out of green paper...and I usually just free cut this.  I don't want all my leaves to look the same.  I cut a slit in the base of the leaf, fold one side over and slightly bend the leaf upright.

 
Finally I hot glue everything together and I have a nice paper rolled flower.

Add it to a vase and you have a beautiful long-lasting flower arrangement.

 
I hope you have enjoyed my craft today...it's a fairly fast and easy one that can be used in various decorations schemes.  It's not JUST a "fall" craft!
 
I'll start on some Christmas flowers to add once the season changes.
 
Thanks for stopping.
 
Bye for now!
 

Monday, September 24, 2012

welcome back fall and me

  Yes, it's been awhile! 
 
I don't have any reasons why I haven't written.  No major life changes or illness which is always good news.  I guess I've been busy, lazy and I honestly haven't had much to write about. 
 
Until now!
 
I've been really motivated with the upcoming holidays.  My house is decked out in fall.  I've even looked through my Christmas ornaments packed downstairs to see what I can do differently for this year. 
 
So again I welcome fall with my corn husk wreath for the front door.
 
 
Instead of tying the orange ribbon into a bow like last year, I wrapped it and tacked it to the top of the door.  This gives the wreath a cleaner and more polished look.  You can read how I made this wreath by clicking here.

 
Then off into our living room...
 
 
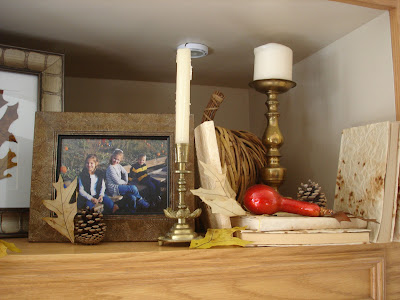
I don't believe I've ever showed a complete picture of the room.  We do not have a fireplace with a mantel, but I have a little niche above our TV that I change out as the seasons come. 
 
Right now I have wicker pumpkins, leaves, gold candlesticks, a collection of books and 2 pictures: one of my 3 favorite people and one that I put together a grouping of leaves.
 
In somethings I like order and symmetry and somethings I like random placement.  In this situation, I like how there are varying heights in all areas of the niche.  It's not predictable!
 
 
I did notice that it is some what hard to see the larger pumpkin in these photos.  So I did raise it up a bit but did not retake the pictures.

 
Also I'm not totally sure on my leaf art picture.  I don't know if I like the white mat on the white piece of paper the leaves are placed on.  The mat blends in and it's hard to tell that it's even there from a distance.
 
My Dad has given me a cutting mat contraption along with several different colored mats that I know one would look good in this grouping, but the thing looks COMPLICATED and haven't asked for a tutorial on how to use it. 


So there is my fall mantal and hopefully my first of many blog posts yet to come and finish out the year.
 
Welcome back me!
 
I look forward to sharing with all of you as the seasons go.
 
Thanks for stopping,
 
Bye for now.


Thursday, March 8, 2012

an invitation, a thank you and a free download

  I wanted to share my birthday invitations and thank you notes I made for my daughter's birthday.

If you missed my gazillion pictures of the party, you can view them here


I made the scalloped border in a pink color and then glittered it.  The invitation envelopes are a glittery gold lined with a shimmering hot pink paper.  The note card envelope liners are what designers say "is the jumping off point".  I found this wrapping paper at Hobby Lobby.  The polka dots are playful but seem more grown-up when it's in gold.  I snatched the roll right up...not like it was the only one left or there were tons of people in the aisle.  I just knew this was the direction I wanted to go.


The glitter really does stay on....yeah it made rub off a bit when you run your hand over it.  I really don't know why I didn't see that when I was taking the picture!


 I made these four note cards for personal download use. 

I buy my envelopes from Paper Source.  These note cards fit perfectly in the 4 Bar size.


I wanted to show different embellishment options that you could do...

The first card I simply just rounded the corners - nothing too fancy.


Second card I added I flower and a ribbon leaf.


Third option I again added glitter.


And finally the fourth I tied baker's twine around it with a simple pearl flower attached to the bow.


Now for the download part....this is new for me so please let me know if there are any kinks.

All that I ask is that if you are not a follower or if you are a new visitor, if you wouldn't mind following me and sharing the link. 

You should be able to click on the "Scalloped Note Card" title below and it should take you to Scribd where you can download it....or you can click DOWNLOAD here and that should take you there as well.

Scalloped Note Card

Thanks for stopping!

Bye for now. 

Wednesday, March 7, 2012

a glamous big girl party

My big girl turned 10 this past February! 

Ohh what an exciting age!  She definitely is not a little girl anymore and not quite a teen.

A fun age that deserved a glamous big girl party. 

We've done the swimming, play park, movie and slumber parties.  I wanted to create a party where girls got dressed in fancy party clothes and ate, danced and mingled. 

I glittered, sewed, pom-pomed and baked to get things ready.  I also did a lot of pinning!  If you follow me on Pinterest, I pinned a lot of pink, white and gold parties. 

So here is just a few(hehe) pictures of the details....


I wanted to create a whimiscal tree with recycled glittered Christmas ornamnets as the centerpiece.


My lollipop circle tissue paper fluffs were super easy to make.  I will show how sometime soon.


Cupcake toppers are from this adorable Etsy shop, Icing Designs.


The paper doily banner and glittered flower streamers are from Martha Stewart.  I did add my daughter's name to the center of the doilies.  The glittered "HAPPY BIRTHDAY" banner was made by me the same way I did my "THANKFUL" banner found here.


My sandwich toothpicks were another easy project.  I will show how to make those as well.


The ruffled fabric garland was also sewn my me....and it still amazes me that I did this one!  I need to perfect a few things before I show anyone my method.


I made a bunch of symbols, number "10"s and letter "C"s out of glittered cardstock to hang in the tree.


And finally my oversized cardboard letter "C".  This too was an easy project but did take awhile.  I used the same technique as I did with my hanging crepe paper flowers found here.  The only difference was that I used strips of crepe paper in lengths of 2' instead of 4'.


Finally every party has to have balloons!  There is just something about balloons.  This party I ordered extra-long strings so that the girls could reach them.

The party went well!  I thought girls would mingle around the food and into our living area.  Instead they would grab a bite to eat and go back into my daughter's room.  At one point I went into her room and found all 8 girls on the top bunk sitting and talking.  I guess at this age they need their privacy too!

Thanks for stopping!

Bye for now.